Export Apple Contacts into an Apple Numbers Spreadsheet
A drag and drop from one app to the other is all it takes, but the subtle nuances are worth understanding beforehand
I've always liked the way Apple managed contacts in their contacts app. One issue I have, however, is I can only view a single contact at once. If I forget what a person's name is but I know the company they work for, I can search for it. That's no problem. It's when I need to organize and visualize an entire group of contacts. For example, when are all my family members birthdays? I can't search for that. Luckily, there is an easy way to export Apple contacts into an Apple Numbers spreadsheet. It's a perfect way to visually organize information with the utility of a spreadsheet. This post discusses how to do this and why.
Things to Know
- To export a contact, simply drag a contact name from the Contacts app into a Numbers spreadsheet. To export more than one contact, press Command or Shift to additional contacts.
- When exporting, ALL DATA entered for that contact transfers over even if set to "private". You are unable to select which pieces of information to export. However, simply delete any data you don't need from the spreadsheet once the export is finished.
- Each piece of data is in it's own column, i.e. first name, last name, etc. If additional columns are needed, they are automatically created (with one caveat, see below).
How to Export Apple Contacts into an Apple Numbers Spreadsheet
While there are various ways to export contacts from the Contact app on a Mac (such as a PDF, vCard, or an archive) this post will go into exporting them into a Numbers spreadsheet.
Step 1 - Open Contacts and Numbers
Open your Numbers App and create a new spreadsheet (or open an existing spreadsheet that you wish to add contacts to)
Step 2 - Select Contacts to Export
Open your Contacts App and select which contacts you want to export.
- To Select All Contacts: Click on a single contact, then hit CMD + A
- To Select Only Some Contacts: Click on a single contact you want to export, then hold down the CMD key while continuing to selecting other contact you want to export
Step 3 - Drag Contacts to Apple Numbers Spreadsheet
Click and drag your selected contacts to anywhere in your Numbers spreadsheet. You'll see an icon that looks like a vCard along with a number which represent the number of contacts you selected.
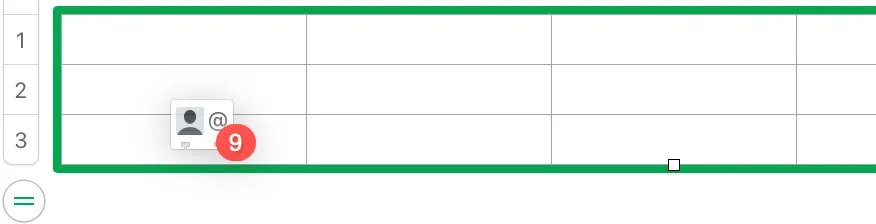
If you drag the contacts to an existing table, you'll notice a thick green box around that table which indicated this is where your contacts will populate. If you release in an area where there is no table, a new table will automatically be created. Regardless of wherever you drag and release, your table will automatically create enough rows and columns to hold the information. Each cell will contain a single field related to that contact.
Step 4 (Optional) - Delete Data or Columns You Don't Need
Now that you have successfully exported Apple Contacts into an Apple Numbers spreadsheet, you can delete those items which you don't want included on the spreadsheet itself. This can be things such as any irrelevant information or sensitive/private information you don't wish to share.
You can then export the spreadsheet itself to another format, if needed.
IMPORTANT: ALL information you have for that contact, including photos, notes, or anything else you may want or have set to private, WILL STILL BE INCLUDED IN THE EXPORT. There is no way to select only certain fields which is different than if you were to share the contact from your iPhone. Ultimately, you can always delete this information once it's in the spreadsheet, but not beforehand.
Things to Keep In Mind When You Export Apple Contacts into an Apple Numbers Spreadsheet
Here are some things to keep in mind when you export apple contacts into an Apple Numbers spreadsheet:
- This process is only available through a Mac. You're unable to perform this through iPad or iPhone.
- Any contact information you have set to private WILL STILL TRANSFER when you export into a Numbers spreadsheet. However, you can always delete this information from the spreadsheet itself afterwards
- Once in your spreadsheet, you can further export this contact information into other format options available in Numbers.
Columns and Data Points Always Take The Lead of the First Set of Exports
Importantly, while columns are automatically created to suit all data points for a contact, this is only true on the first set of exports per spreadsheet table. If subsequent contact exports don't contain similar data points, those subsequently exports will only populate the data points for the columns created.
For example, let's say your first set of exports has first name, last name, and phone number. Numbers will create those columns and fill in the information for those contacts respectively. However, if separately you then exported another contact to that same Numbers table and that contact has an address, the address will not populate.
In order for additional information to populate, you'll need to manually add the data point in Contact format or you can export to a separate table in your spreadsheet. Alternatively, it may be easier to re-export all of the contacts you need at one time to avoid any missing information.
Wrap Up
The export process from the Contacts app to the Numbers app is easy and straightforward. It's a great way to quickly organize information about your contacts and visualize a group of people. While exporting subsequent contacts may pose a challenge, there are define workarounds to avoid it.
You can find more information about this entire process from Apple here.


Member discussion