Create Fun, Animated GIFs Using Apple Keynote
Yes, you can create animated GIFs in Keynote. Using Keynote's animation tools and a little imagination, you too can make something fun
You may think Keynote can only create presentations or slide decks. While that is the primary focus, you can also use it to create animated GIFs. You could actually use this feature on an entire presentation you've created or simply for creating the GIF itself. No third party software needed! In this post, I'll show you how to easily create animated GIFs using Apple Keynote.
The GIF I Created
In the spirit of Thanksgiving this week, I've created this animated GIF:

All I used was a royalty free clip art image of a turkey, some text I typed in Keynote, and this website logo. Just as you would with any Keynote slide, I animated the various elements using the built in Keynote animation action functions and transitioned to the final slide that says Happy Thanksgiving". This simple GIF took about five or so minutes to create. I then sent it as a text message to a few friends who, I believe, were mildly impressed. I digress, but the point is that it's something fun to create and simple to do. Let's dive into the specifics on how to create animated GIFs using Apple Keynote.
Design What You Want For Your GIF First
First things first, here's what I used to create the GIF above:
- A clip art turkey I found online
- Text Boxes
- My website logo
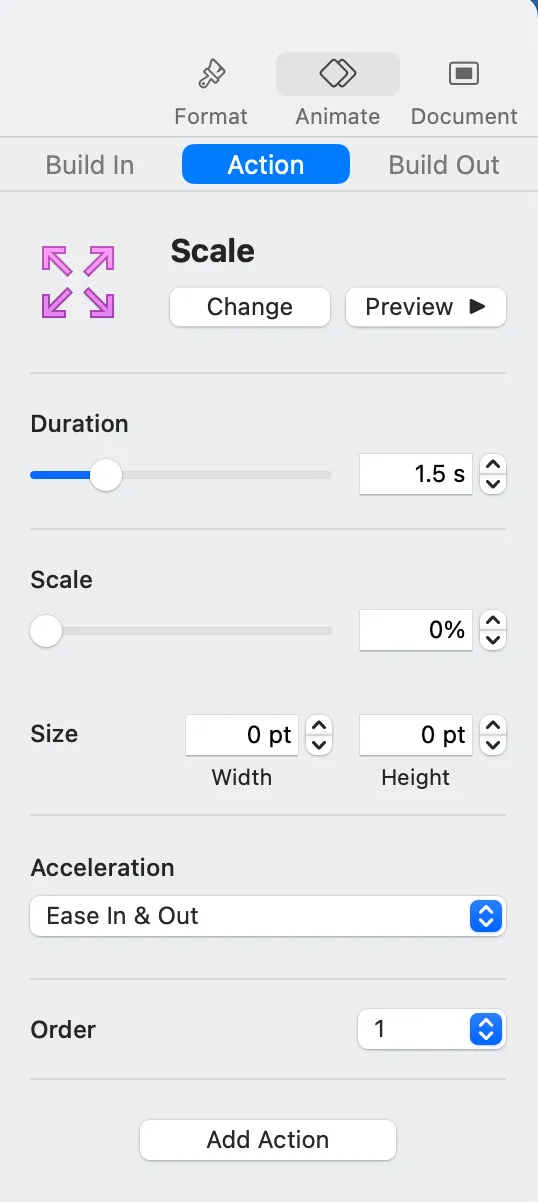
The first animation you see is a single, large turkey shrinking to nothing. After I sized and centered my turkey to my liking, I selected my turkey. From there, I went to the sidebar and chose Animate -> Action -> Add an Effect -> Scale. I then changed the scale to 0%. This would make the turkey go from the size it is to looking like it disappeared.
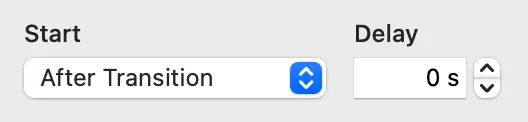
Also, on the sidebar towards the bottom, there is a button that says Build Order. Click on this button. Now, with your turkey selected, make sure the Start drop down option says After Transition with the delay at 0s. You don't necessarily need to do this step, but I like doing it as a best practice. By doing this, the animation will begin as soon as you hit Play. When you go to export this into a GIF (more on that later), the GIF should start automatically anyway. To avoid any frustration or technical issues, I like to do that anyway.
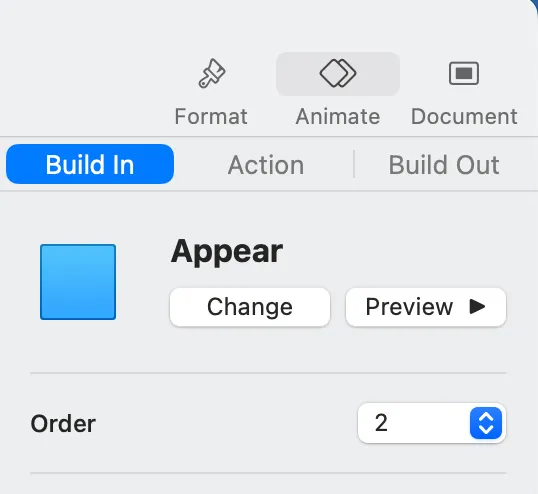
From there, I copied and pasted a the same turkey image and resized to make it smaller. By doing a copy/paste, I also end up copying the animation I just did. However, I don't want this turkey to scale down and disappear. I want it to actually appear. So, to make that happen I change the action from Scale to None. I then click on the Build In tab, click Add an Effect and select Appear as shown in the below screenshot.
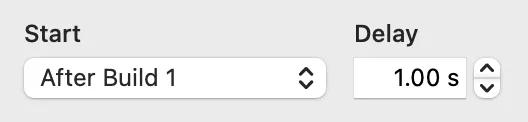
Now, on the sidebar towards the bottom, there is a button that says Build Order. By clicking this button, you'll bring up the build order which is essentially referring to the animation order. This part is important. Under Start, you'll want to click the dropdown box and select After Build 1. This mean the this animation will being after the first animation has take place. I set the delay to 1.00s to allow some "breathing room" between the first and second animation.
I repeated the copy/paste (with the smaller turkey) process and placed another turkey in a different area on the slide. Again, by copy/pasting, it keeps the previous animation settings. By the time I got to my 4th and 5th turkey, I set the delay to 0.50s to make the animations speed up a little but. Starting with the 6th turkey, I then changed the delay to 0.10s. I repeated this process while randomly resizing the turkeys and randomly placing them on the slide. When I was satisfied with what I had, I create a Slide Transition.
The Slide Transition
A slide transition marks the animation that will take place between slides as opposed to what's on the slide (with one exception which I'll get to soon). To create a slide transition, you first need to click on the slide itself. This can be easily done in the View pane under Navigator. From there, click on Animate -> Add an Effect -> Magic Move.
Without getting too much into what Magic Move is, it will basically animate the movement of an element that is on your first slide to the second slide. For example, you can see the GIF I created that a single turkey moves from the spot its on to the center and the "HAPPY THANKSGIVING" words, etc. pop up.
So, in order for this to work, we'll need a second slide. Once created, I added the turkey where I wanted. This will allow the Magic Move transition to animate a turkey movement from the first slide to the second. I then added some text using text boxes and inserted an image of my logo. Believe it or not, there are actually no animations on the second slide. After the Magic Move takes place, the remaining text and images simply appear.
Exporting Your Keynote as an Animated GIF
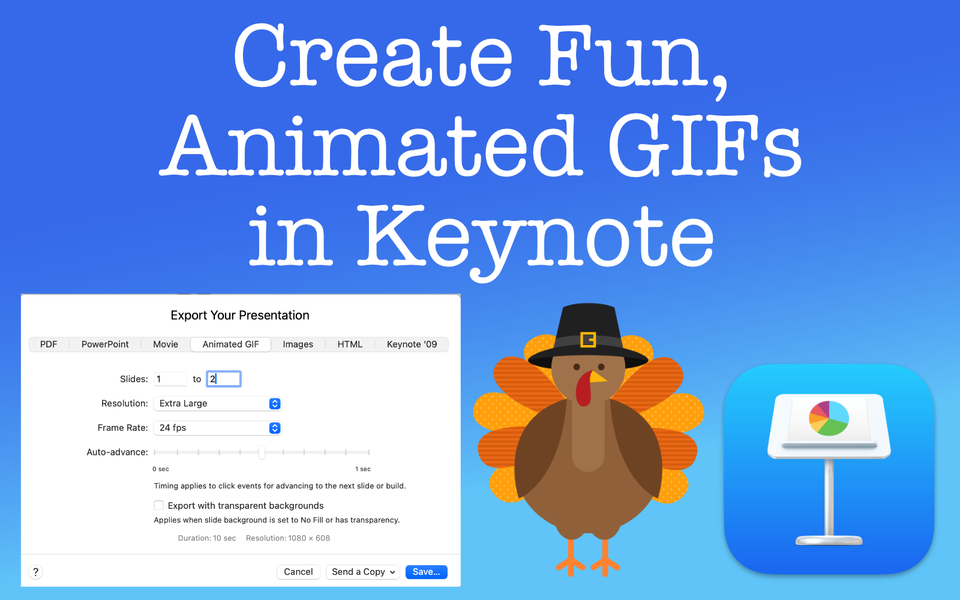
Now that you have animated what you need, it's time to export the Keynote file into an Animated GIF. To do so, go to File -> Export To -> Animated GIF.
This step is important. Make sure you change the slides to export all slides. In this case, we want to make sure it exports from slide 1 to slide 2. You can adjust the various other options in the export screen to your liking, although pay attention to the "Export with transparent background". You may or may not want this checked depending on where the GIF will be posted. Once you've selected what you want, click "Save".

Wrap Up - Creating Animated GIFs Using Apple Keynote
That's it. You now have created an animated GIF. You can post it wherever GIFs function such as text messages, websites, social media, etc.
Keep in mind, if you were to open the GIF file on your computer, you will see a bunch of random slides slowly animating the things you created in Keynote. This is because the file will (most likely) open in the Preview app. Preview can't run GIFs so that's why you see various slides. Not to worry because if you're looking to test it before sharing with others, you can text yourself the GIF and see if the animation takes place. If so, congrats. If not, double check the settings when you exported it just to make sure you didn't skip over anything.
Enjoy your new animated GIF maker. Just imagine all the things you can now create!

Member discussion